Publishing Web documents
Due 11:59pm on July 20. You are strongly encouraged to finish this exercise. No class time will be given on Monday, Q & A only.
- This exercise combines the new information with the hands-on activities.
- You should
- read through the discussion and steps for each activity
- then carry out the steps.
- In general
- Items with bullets are information to be read
- Items with numbers are steps to be carried out
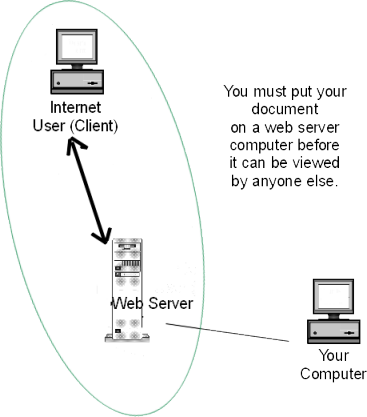
Background: About Servers
- As long your HTML document is on your local computer (or your Z drive or a removable disk), no one else can see it.
- You must publish your document file so that you or other users can browse to it it over the Web.

- To publish it, you copy it to a computer that has a Web server software that lets it respond to requests.
- You need to be allocated space on the server's system.
- You usually need to sign on with a username and password before you can store files.
- If the server is a separate computer, you must use a file transfer program to copy it.
Your Account For this class
- You have been given an account (username, password, and storage space) on the computer wyrd.hood.edu.
- Wyrd is a PC running the Linux operating system and the Apache web server program.
Your web page URL
- Your web site will be found at
http://wyrd.hood.edu/~abc321/ with your own login username instead of abc123 - (Note: the ~ is on the key above the Tab key)
- Type it into the browser and see what happens.
File Transfer(FTP) Program for this class
- The file transfer program we will use in class is the FireFTP add-on for the Firefox browser.
- If you do not have FireFTP installed on Firefox, go ahead and install it now.
Notes on file names
- The name in a URL must be typed exactly the same as the file name, including case
- On most web servers, file names are case sensitive
- wyrd.hood.edu file names are case-sensitive
- Do not use spaces in web file names.
- The space is supposed to mark the end of a URL.
- Some browsers will guess what is intended and fix spaces up, but some will not.
- If you put spaces in file names, some users will not be able to view your documents.
- If you want to distinguish parts of a file name, use an underscore.
Activity 1: Get Set Up
A. Get connected
Your tasks
- Start FireFTP
- Tools:Web Developer:FireFTP

- Note that this is not the Web Developer Extension.
- FireFTP will create a split window in your browser
- Tools:Web Developer:FireFTP
- Sellect "Quick Connect"

- In the "Main" tab, type in "wyrd.hood.edu" and YOUR OWN login username and password.

- In the "Connection" tab, choose SFTP for the Security.

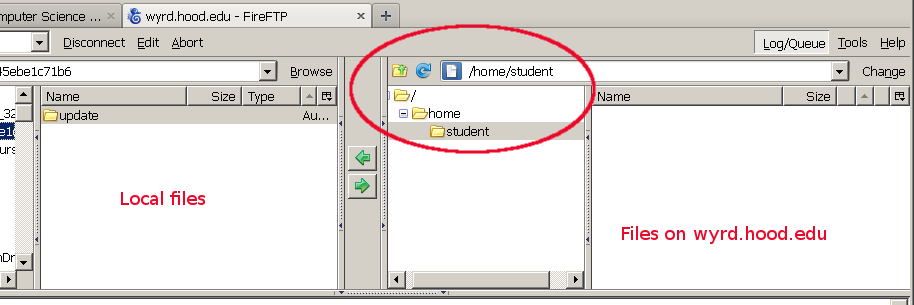
What you should see
- You should see a split window.
- left side: shows your local files.
- right side: shows your space on wyrd.hood.edu.
- It is a view of your file listing on the remote computer.
- It will be empty until you create some files there.

What might go wrong:
- If the program says "Unable to make a connection. Please try again."
- Check to be sure "wyrd.hood.edu" is typed correctly
- Check to be sure SFTP is selected as for Security
- If the program is connected, but asks again for your login information,
- Be sure both your username and your password are typed correctly.
- Both the usename and password are case-sensitive, so also check the Caps-Lock key.
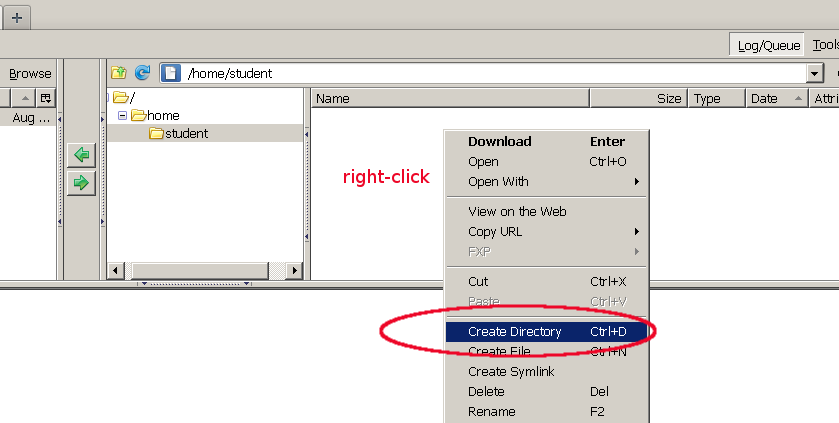
B. Make a place for your Web Files
Notes:
- The Web server on wyrd.hood.edu is only allowed to show files that you store in a special directory (folder)
- the directory name must be
public_html. - if a file is not within that directory, it cannot be seen on the Web.
Your tasks :
- Right-click in the empty right area.

- Choose "create Directory" from the dropdown.
- Give the newly created folder the name
public_html. Be sure to- use all lower case - the name is case sensitive
- include the underscore in the middle
- You should see the
public_htmlfolder listed on the right hand side of the split window
- Double-click on the new folder to see the contents. (There won't be any at first).

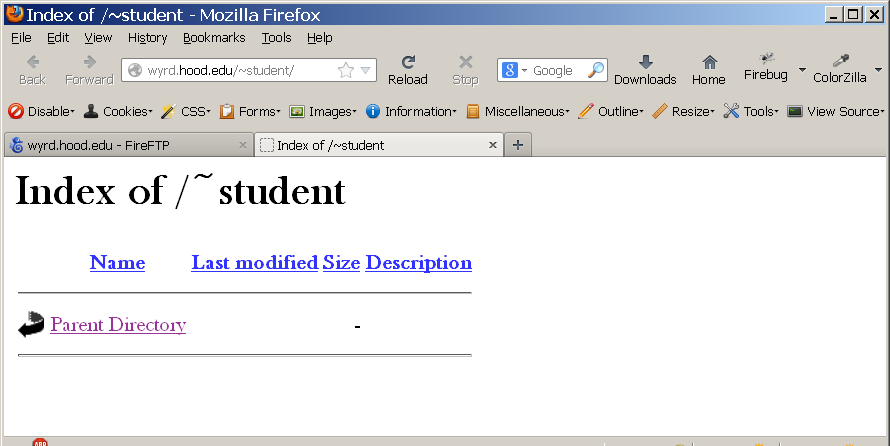
C. Look at your Web Site
Your tasks
- Do not close the FireFTP tab, keep it open.
- Open a new copy of Firefox (or open Chrome if you prefer)
- Enter the URL
http://wyrd.hood.edu/~abc123- Replace "abc123" with your own assigned username.
- The tilde
(~)is on the upper left of the keyboard.
- Keep the browser window open, do not close it
The result
- The first time, you should see a listing headed "Index of..."
- There won't be any files listed yet.
- Later the view will change.
Activity 2: Publish A Document On Your Site
A. Get some files:
Your tasks
Upload a document file
Copying a file to the server is called uploading.
- Switch back to the FireFTP window
- Browse through the folders in the left window until you find where you saved the lab 06 HTML document.
- Then drag and drop that file from the left window to the right window.
- Be sure you copy it into the
public_html directory.
- Keep the FireFTP window open, do not close it
Look at your web site
- Switch back to the browser window
- Refresh the browser (Click the swirling arrows on the navigation toolbar.) - you should see your file listed.
- If you do not see your file, you probably did not copy it into the
public_html directory.
- Try again.
- Be sure you copy it into the
public_html directory.
- Click on your file's name to view the page.
- Look in the location box on the navigation toolbar. The URL of your web document should be
http://wyrd.hood.edu/~your_user_name/lab06.html
with your own username after the ~.
- Click the browser's back button to go back to the directory index
Upload related files
Observation
- Your published will not look the same as the original.
- the page uses an external style sheet
- the web server cannot see your local copy of the style sheet file
- the stylesheet has to be on the server too
Your tasks
- Upload the stylesheet file the same way you did the HTML document (switch back to FireFTP)
- Refresh the browser - you should now see both the HTML file and the CSS file in the listing
- Click on your file's name to view the page - it should now be using the styles
What can go wrong
- If you do not see the CSS file in the listing along with the HTML file
- Be sure you refreshed the browser
- Be sure you copied the file into the
public_html directory
- If your page isn't using the styles
- Refresh the browser
- Check that you copied the CSS file into the
public_html directory
- Check that you saved the css file with the original name
Your tasks
Upload a document file
Copying a file to the server is called uploading.
- Switch back to the FireFTP window
- Browse through the folders in the left window until you find where you saved the lab 06 HTML document.
- Then drag and drop that file from the left window to the right window.
- Be sure you copy it into the
public_htmldirectory. - Keep the FireFTP window open, do not close it
public_html directory.
- Try again.
- Be sure you copy it into the
public_htmldirectory.
http://wyrd.hood.edu/~your_user_name/lab06.html
with your own username after the ~.
Observation
- Your published will not look the same as the original.
- the page uses an external style sheet
- the web server cannot see your local copy of the style sheet file
- the stylesheet has to be on the server too
Your tasks
- Upload the stylesheet file the same way you did the HTML document (switch back to FireFTP)
- Refresh the browser - you should now see both the HTML file and the CSS file in the listing
- Click on your file's name to view the page - it should now be using the styles
What can go wrong
- If you do not see the CSS file in the listing along with the HTML file
- Be sure you refreshed the browser
- Be sure you copied the file into the
public_htmldirectory
- If your page isn't using the styles
- Refresh the browser
- Check that you copied the CSS file into the
public_htmldirectory - Check that you saved the css file with the original name
Activity 3: Hide The Directory Listing
Background: The index.html file name
- Most of the time you do not want the world to see the listing of your
public_htmldirectory contents - you usually want a "home" page to be displayed right away.
- The system is configured to show a default page from your
public_htmldirectory - the file for the default page must named
index.html(all lowercase) - if your
public_htmlcontains a file name index.html, the Apache web server will serve that file instead of making a directory index listing. - So to hide the directory listing from public view, put a file named index.html in your
public_html.
Your tasks
- Be sure your site directory listing is showing in the browser window.
- Modify a short HTML document - Start with this basic page.
- The title and heading should be your name. Replace the "[your name]" with your own name.
- It should have one paragraph that says: "This is my site index page. It doesn't say much at this point."
- Save it with the name "index.html"
- Upload it into your
public_htmldirectory - Refresh the browser that shows your site
What you should see
- You should see your index.html page displayed in the browser window
- You should not see the directory listing.
What can go wrong
- If you still see a directory listing:
- Be sure you refreshed the browser
- be sure you uploaded the index.html file into the
public_htmldirectory - be sure it was named index.html (all lowercase)
Activity 4: Create A Multi-Page Site
Background
- The index.html file hides the directory listing.
- No one can see that your first published page, the FTP_practice.html one, is there
- They can view it if they type in its complete URL
- How do you let viewers know the other file is there.
- You must include a link to it on the index page.
Your tasks :
- Edit your index.html file.
- Add a paragraph that says "See my other page" and Make the line of text into a link to the FTP_practice.html page--use a relative URL with the href value just the file name.
<p><a href="FTP_practice.html">>See my other page.</a></p>
- Upload the revised index file.
- Refresh the browser and test to be sure the link works.
- If you make additional changes to your index page, be sure to upload the file again. Your editing changes are only saved locally, not on the server.
Activity 5: Add An Image To Your Index Page

- Here is an image of the first computer mouse (1968), in the hand of its inventor, Doug Englebart.
- SAVE a copy of the image (right click and choose "Save Image as")
- ADD an image tag to your index page so the mouse picture is displayed. Use a relative url (just the file name);
<img src="mouse.jpg" alt="first
mouse">
- Upload the page and refresh the browser. Do you see the image?
- If you did only these steps, you will not see the image. It needs to be on the server with the document file.
- UPLOAD a copy of the image to your
public_htmldirectory on wyrd. refresh the browser. You should see the image in the page.
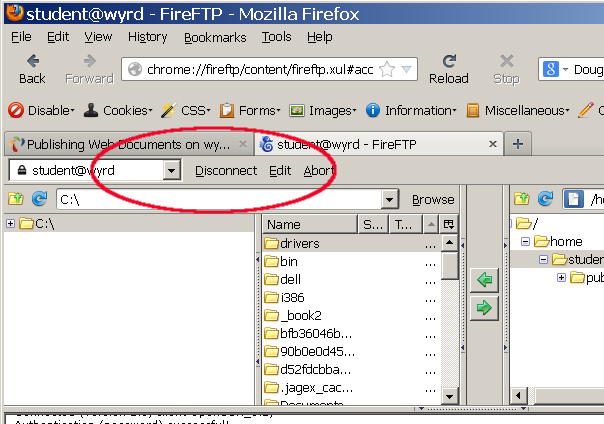
Activity 6: Disconnect FireFTP
- When you are through working, always disconnect from the server.
- Click "Disconnect" beside the connection name.
- If you haven't completed the other activities, come back later to finish them.
Activity 7: Submit Your Page
- Validate your page — submit the URL to the validator and correct any errors that are reported.
- Complete the lab submission on Blackboard.
- In the response box, provide the URL of your page. (You can copy and paste it from the browser.) BE SURE IT IS CORRECT.
- Make the URL into a hyperlink — select the URL text and click the chainlink.
- You do not need to attach any files.
Guidelines for published assignments
- Be sure your published web documents are stored inside your
public_html directory.
- Prevent revealing directory listings from showing by putting a file named
index.html in new directories inside your public_html.
- Make sure files names in links are exactly the same as the ones saved - including case.
- Do NOT use spaces in web file or folder names. Use an underscore (_) to break up parts of a name.
- Use relative URLs for pages and images that are within the same site as the page that uses them.
- If you change a file, upload it again.
- Be sure to upload any images you use. And check to be sure the URLs are correct. I can't see your Z drive!
- Be sure to disconnect and log off when you are finished.
Evaluation Checklist
public_html directory created- Extra files uploaded
index.html uploaded; correct name & contents- image uploaded and shown in page
- correct URL provided as hyperlink
public_html directory.index.html in new directories inside your public_html.public_htmldirectory created- Extra files uploaded
index.htmluploaded; correct name & contents- image uploaded and shown in page
- correct URL provided as hyperlink